Monday, November 15, 2010

Oatmeal chocolate chip cookies

Chewy Chocolate Chip Oatmeal Cookies Recipe

Ingredients

  • 1 cup butter, softened
  • 1 cup packed light brown sugar
  • 1/2 cup white sugar
  • 2 eggs
  • 2 teaspoons vanilla extract
  • 1 1/4 cups all-purpose flour (we used whole wheat flour and I don't think it made a difference)
  • 1/2 teaspoon baking soda
  • 1 teaspoon salt
  • 3 cups quick-cooking oats (I'd go closer to 2 cups of oats)
  • 1 cup chopped walnuts
  • 1 cup semisweet chocolate chips (we got these huge milk chocolate chips which were good, but I almost think they made the cookies too sweet...so I'd stick with the semi-sweet)

Directions

  1. Preheat the oven to 325 degrees F (165 degrees C).
  2. In a large bowl, cream together the butter, brown sugar, and white sugar until smooth. Beat in eggs one at a time, then stir in vanilla. Combine the flour, baking soda, and salt; stir into the creamed mixture until just blended. Mix in the quick oats, walnuts, and chocolate chips. Drop by heaping spoonfuls onto ungreased baking sheets.
  3. Bake for 12 minutes in the preheated oven. Allow cookies to cool on baking sheet for 5 minutes before transferring to a wire rack to cool completely.

Sunday, November 14, 2010

Pumpkin Things


I'm obsessed

Pumpkin Butter


Pumpkin Butter
Adapted from AllRecipes

1 (29 ounce) can pumpkin puree, approx. 3 1/2 cups **I did not use this exact amount at all, plus I roasted the pumpkin and pureed it in apple cider until it was about the consistency of canned pumpkin
3/4 cup apple juice **definitely use apple cider instead. I ended up using way more than this because I added some for pureeing. It doesn't matter how much you use. You can always reduce it to the right consistency by cooking more
2 teaspoons ground ginger **I used way more spices than they called for...
1/2 teaspoon ground cloves
1 1/3 cups brown sugar **I used about this much sugar, maybe a bit less
1 tablespoon ground cinnamon
1/2 teaspoon ground nutmeg

Juice of half a lemon

1. Combine pumpkin, apple juice, spices, and sugar in a large saucepan; stir well. Bring mixture to a boil. Reduce heat, and simmer for 30 minutes or until thickened. Stir frequently. Adjust spices to taste. Stir in lemon juice, or more to taste. **cook it as long as you want, until it's the right thickness. I like mine really thick and 30 minutes was about right for me.
2. Once cool, pumpkin butter can be kept in an airtight container in the fridge.

To preserve: Spoon hot pumpkin mixture into hot jars, filling to within 1/4 inch from top. Remove air bubbles; wipe jar rims. Cover at once with metal lids, and screw on bands. Process in a boiling water bath for 10 minutes.


Pumpkin Bread Pudding

This is amazing....obvi

Pumpkin Bread Pudding
Adapted from Gourmet Magazine, October 2007

I made a few of my own adaptations to this, using only milk and no cream (to me, it makes no difference to me in dishes like this, so I figure I’ll give my arteries a break), and doubling almost all of the spices. Oh, and I added bourbon, but you probably anticipated that.

1 1/2 cups whole milk (Or 1 cup heavy cream plus 1/2 cup whole milk)
3/4 cup canned solid-pack pumpkin
1/2 cup sugar
2 large eggs plus 1 yolk
1/2 teaspoon salt
1 teaspoon ground cinnamon
1/2 teaspoon ground ginger
1/8 teaspoon ground allspice **I skipped this...expensive...and used lots of the other spices
Pinch of ground cloves
2 tablespoons bourbon (optional)
5 cups cubed (1-inch) day-old baguette or crusty bread
3/4 stick unsalted butter, melted* (can skip this step if using the second set of instructions)

Preheat oven to 350°F with rack in middle.

Gourmet’s Instructions: Whisk together pumpkin, cream, milk, sugar, eggs, yolk, salt, spices and bourbon, if using, in a bowl.

Toss bread cubes with butter in another bowl, then add pumpkin mixture and toss to coat. Transfer to an ungreased 8-inch square baking dish and bake until custard is set, 25 to 30 minutes.

Alternate, Come On, Be Lazy With Me, instructions: While preheating oven to 350°F with rack in middle, melt butter in bottom of a 8-inch square baking dish. Once it is melted, take it out of the oven and toss bread cubes with butter, coating thoroughly. In a separate bowl, whisk together all the remaining ingredients. Pour them over buttered bread cubes in baking dish, stirring to make sure all pieces are evenly coated. Bake until custard is set, 25 to 30 minutes.**I used this technique. I don't really see why not...


Irish Soda Bread


I'm not sure how much this will actually appeal to others. And logistically, it was sort of a pain (dry, so I added more milk, but then it took forever to cook, etc.), though way easier than other kinds of bread. BUT it is totally amazing. It freezes really well and is extremely dense and hearty and wonderful.

Brown Bread (Irish Whole Wheat Soda Bread)

original recipe: http://www.davidlebovitz.com/2010/09/brown-bread-irish-soda-bread-recipe/

One very large loaf (or two small ones)

I used T110 flour, which in France, is a light whole wheat flour. Which is wholemeal flour in Ireland, and similar to whole wheat pastry flour in the United States. You can use whatever is available to you, as making soda bread isn’t supposed to be a stressful experience. Still, the loaf was a bit heavy. So I think next time I’m going to cut the amount of wheat germ or bran in half, or leave it out completely, to lighten things up a bit.

I also think the large loaf, while a necessity if you’re running an inn and feeding a lot of people, was pretty big for just me, so I would make two smaller loaves and reduce the baking time to compensate. Irish soda bread should be served the same day it’s made; any extra can be frozen.

2 1/4 cups (250g) whole wheat flour
2 3/4 cups (120g) wheat bran or wheat germ, or a combination
4 cups (500g) all-purpose flour
1 1/2 teaspoons baking soda
1 teaspoon salt
2 ounces (60g) butter, salted or unsalted
2 1/2 cups (600ml) buttermilk*
2 teaspoons molasses

1. Put the rack in the middle of the oven and preheat the oven to 350ºF. (180ºC.) Line a sturdy baking sheet with parchment paper or a silicone baking mat and put it on the oven rack.

2. Mix the whole wheat flour and wheat bran or germ in a large bowl.

3. Sift in the white flour mixed with the baking soda and salt. Stir the flours together, to combine.

4. Cut the butter into little bits and rub them into small pieces with the flour mixture using your fingers, until as small as possible.

5. Stir in the buttermilk and molasses until the dough is uniformly damp. Turn out onto a lightly floured countertop and knead not-too-vigorously, until the dough forms a smooth ball. (If making two, divide the dough into two equal-sized pieces and roll each separately.)

6. Use a sharp serrated knife to slice a cross deeply into the top of the bread, about 1-inch (3cm) deep. Place the brown bread loaf on the hot baking sheet, being mindful that the baking pan is hot.

7. Bake for 45 minutes, or until the loaf is firm on top and when you tap the bottom, feels hollow. (If baking smaller loaves, I would begin to check them for doneness after 25 minutes.)

8. Remove from oven and cool on wire rack for one hour.

*For those who can’t get buttermilk, mix 1 part plain whole-milk yogurt with 1 part low-fat or regular milk and let stand for five minutes before using.

Thursday, November 11, 2010

Mini Pumpkin Whoopie Pies

Wicked Good Pumpkin Whoopies (Yields 18 pies)

Cookie ingredients:

  • 2 cups packed brown sugar
  • 1 cup vegetable oil
  • 15 oz can pumpkin puree (approx 1 ¾ cups)
  • 2 eggs
  • 3 cups all-purpose flour
  • 1 teaspoon salt
  • 1 teaspoon baking powder
  • 1 teaspoon baking soda
  • 1 teaspoon vanilla extract
  • 1 1/2 tablespoons ground cinnamon
  • 1/2 tablespoon ground ginger
  • 1/2 tablespoon ground cloves

Directions

1. Preheat oven to 350 degrees F (175 degrees C). Lightly grease baking sheets if needed.

2. Combine the oil and brown sugar. Mix in the pumpkin and eggs, beating well. Add the flour, salt, baking powder, baking soda, 1 teaspoon vanilla, cinnamon, ginger and cloves. Mix well.

3. Drop dough by heaping teaspoons onto the prepared baking sheets. Bake at 350 degrees F (175 degrees C) for 10 to 12 minutes. Let cookies cool then make sandwiches from two cookies filled with filling

Whoopie Pie Filling

  • 4 ounces cream cheese, at room temperature
  • 6 tablespoons butter, softened
  • 1/2 teaspoon vanilla extract
  • 1 1/2 cups powdered sugar

Beat cream cheese, butter and vanilla extract in small mixer bowl on medium speed until fluffy. Gradually beat in powdered sugar until light and fluffy.

Sunday, May 30, 2010

Peach and blueberry crumble

hey guys!

I made this really delicious peach and blueberry crumble last night in Nashville and it was so delicious. I highly recommend trying it at some point this summer. I didn't do the whole ramekin thing because it seemed like it would take too much effort, so I just made it in an 8x11 (ish) pan. The only thing that was strange was that I don't think the crumble topping ever really browned...maybe it'd be better to bake at 375 instead of 350? We ended up just cooking it longer but it was still very delicious. Defnitely requires vanilla ice cream.

xoxo,
margs

peach-and-blueberry-crumble

Peach and Blueberry Crumbles

From Ina Garten’s “Barefoot Contessa at Home”

Serves 5 to 6

For the fruit

  • 2 lbs firm, ripe peaches (6-8 peaches)
  • 2 tsp grated lemon zest
  • 2 tbsp freshly squeezed lemon juice
  • 1/2 cup granulated sugar
  • 1/4 cup all-purpose flour
  • 1 cup fresh blueberries (1/2 pint)

For the crumble

  • 1 cup all-purpose flour
  • 1/2 cup granulated sugar
  • 1/4 cup light brown sugar, lightly packed
  • 1/2 tsp kosher salt
  • 1/4 tsp ground cinnamon
  • 1/4 lb (1 stick) cold unsalted butter, diced

1. Preheat the oven to 350 degrees F.

2. Immerse the peaches in boiling water for 1 minute; then place them immediately in cold water. Peel the peaches, slice them into thick wedges, and place them in a large bowl. Add the lemon zest, lemon juice, sugar and flour. Toss well. Gently mix in the blueberries. Allow the mixture to sit for 5 minutes. Spoon the mixture into ramekins.

3. For the topping, combine the flour, sugars, salt, cinnamon and butter in a food processor. Pulse until the butter is the size of peas. Rub the mixture with your fingertips until it’s in big crumbles, then sprinkle evenly over the fruit. Place the ramekins on a sheet pan lined with parchment paper or Silpat®, and bake for 40 to 45 minutes, until the tops are browned and crisp and the juices are bubbly. Serve warm or at room temperature.

Wednesday, April 28, 2010

Cake!


I'm going to share three new excellent cake recipes, all from the same site. I would vote amazing for all of them, but I would vote first most amazing to the Pink Lady (best cake I have EVER had), second most amazing to the Red Velvet, and third most amazing to the espresso chocolate cheesecake, which pretty much ruined my saturday night with its lethal combo of upper espresso and downer fattiness/excess glucose. It's essentially early death in chocolate cheesy deliciousness. I'd also like to note that the Pink Lady does not have to be made in 3-tier form. I made it in the shape of a giant butt (Body Image project for my female sexuality class: I chose a celebration of the butt), and it was still delicious.

Pink Lady Cake [Strawberry Cake with Cream Cheese Frosting and Filling]

original site: http://smittenkitchen.com/2008/10/pink-lady-cake/

The cake recipe is adapted from Sky High, and the only thing I would change next time would be to add a drop or two of red food coloring because when cake is called Pink Lady, well, it should really be pink.

The cream cheese frosting is not from the book (which has a swiss buttercream-based one I am eager to try when I am not rushing to finish) but a classic, standard recipe. I have upped the amount of cream cheese frosting from what I used, which you can see is spread a tad thin. Pretty pink princesses should never be deprived of fluffy vanilla cream cheese frosting on their birthdays, you know?

For the cake
4 1/2 cups cake flour
3 cups sugar
5 1/4 teaspoons baking powder
3/4 teaspoon salt
3 sticks (12 ounces) unsalted butter, at room temperature
1 1/2 cups pureed frozen strawberries*
8 egg whites
2/3 cup milk
1 to 2 drops red food dye, if using (to make the pink color pop more)

For the cream cheese frosting
3 (8 ounce) packages cream cheese, softened
3/4 cup (1 1/2 sticks; 6 ounces) unsalted butter, softened
3 cups sifted confectioners’ sugar
2 teaspoons vanilla extract

Make the cake
1. Preheat the oven to 350»F. Butter three 9-inch round or 8-inch square cake pans. Line with parchment or waxed paper and butter the paper.

2. Put the flour, sugar, baking powder, and salt in a large mixer bowl. With the electric mixer on low speed, blend for 30 seconds. Add the butter and strawberry puree and mix to blend the ingredients. Raise the speed to medium and beat until light and fluffy, 2 to 3 minutes; the batter will resemble strawberry ice cream at this point. (Deb note: I must warn you not to try the batter at this point. Not even a smear of it. How unbearably good it is will shock you, and lead to more dipping. Only you can stop this from coming to pass.)

3. In another large bowl, whisk together the egg whites, milk and red food dye, if using, to blend. Add the whites to the atter in two or three additions, scraping down the sides of the bowl well and mixing only to incorperate after each addition. Divide the batter among the three prepared pans.

4. Bake the cakes for 30 to 34 minutes, or until a cake tester or wooden toothpick inserted into the center comes out clean. Allow the layers to cool in the pans for 10 to 15 minutes. Invert and turn out onto wire racks and peel off the paper liners. Let stand until completely cooled before assembling the cake, at least an hour.

Make the cream cheese frosting
5. In a medium bowl, cream together the cream cheese and butter until creamy. Mix in the vanilla, then gradually stir in the confectioners’ sugar. Store in the refrigerator after use.

Frost and assemble the cake
6. Place one cake layer on a cake board or platter. Tucking scraps of waxed paper under the edges of the cake will protect the board or plate from any mess created while frosting the cake. (I forgot, as can be clearly seen above.) Spread about 2/3 cup frosting over the layer, spreading it to the edge. Repeat with the second layer. Add the top layer and frost the top and sides of cake with remaining frosting, reserving a small amount if you wish to tint it and pipe a decoration on the cake. If not, you can decorate the cake top with thinly-sliced strawberries. Remove the waxed strips to reveal and neat, clean cake board.

7. Serve with pink candles on pink plates to the sort of person who dreams in pink. I suspect you know at least one.

* Huntsman notes that it may seem surprising that frozen strawberries are used here, but they’re always available and their quality is consistent. I suspect you could swap fresh ones, but given that the ones in the store in October are so lackluster, and cruelly unlike the astounding ones we had in Paris last week, I went with her suggestion. This will be from about half a one-pound bag.

Red Velvet Cake
Adapted from “The Confetti Cakes Cookbook” by Elisa Strauss via the New York Times 2/14/07

original site: http://smittenkitchen.com/2007/09/red-velvet-cake/

Yield: 3 cake layers

1 tablespoon unsalted butter
3 1/2 cups cake flour
1/2 cup unsweetened cocoa (not Dutch process)
1 1/2 teaspoons salt
2 cups canola oil
2 1/4 cups granulated sugar
3 large eggs
6 tablespoons (3 ounces) red food coloring or 1 teaspoon red gel food coloring dissolved in 6 tablespoons of water
1 1/2 teaspoons vanilla
1 1/4 cup buttermilk
2 teaspoons baking soda
2 1/2 teaspoons white vinegar.

1. Preheat oven to 350 degrees. Place teaspoon of butter in each of 3 round 9-inch layer cake pans and place pans in oven for a few minutes until butter melts. Remove pans from oven, brush interior bottom and sides of each with butter and line bottoms with parchment.

2. Whisk cake flour, cocoa and salt in a bowl.

3. Place oil and sugar in bowl of an electric mixer and beat at medium speed until well-blended. Beat in eggs one at a time. With machine on low, very slowly add red food coloring. (Take care: it may splash.) Add vanilla. Add flour mixture alternately with buttermilk in two batches. Scrape down bowl and beat just long enough to combine.

4. Place baking soda in a small dish, stir in vinegar and add to batter with machine running. Beat for 10 seconds.

5. Divide batter among pans, place in oven and bake until a cake tester comes out clean, 40 to 45 minutes. Let cool in pans 20 minutes. Then remove from pans, flip layers over and peel off parchment. Cool completely before frosting.

Cupcake variation: Since this has been published, many readers have written in to express that it adapts well to cupcakes. The yield is approximately 35 cupcakes, with the liners filled only 3/4 of the way, and the baking time should be between 20 to 25 minutes, but check in on them 2/3 of the way through in case your oven gets the job done faster.

Cocoa Notes

* Some red velvet cakes have no cocoa, others have up to half a cup. The less cocoa, the brighter the red, and the less food dye is needed to give it the desired hue. This cake has more cocoa and quite a bit of red dye, but as you cans see from the picture, it is a real stand-out red. Feel free to use less, but make sure you dissolve it in 6 tablespoons of water to compensate for any moisture lost.
* Dutch versus Non-Dutched cocoa: This recipe uses baking soda, so it calls for non-Dutch-Processed cocoa. The reason is that Dutch-Process cocoa is neutral and will not react with baking soda, so it can only be used in 1) recipes with baking powder or 2) recipes with enough other acidic ingredients that will compensate for the lack of acidity. However, you’ll notice that this recipe has both vinegar and buttermilk in it, or quite a bit of acidity, leading me to wonder if either kind of cocoa could be used with success. I had non-Dutch on hand, so I used it, but if you only have Dutch and try this recipe, let us know if it works. Personally, I prefer the Dutched stuff because it usually is of a higher quality with a more delicate chocolate flavor.

Cream Cheese Frosting
Adapted from several sources

Makes 6 cups

8 ounces cream cheese, room temperature
1/2 cup (1 stick) butter room temperature
3 cups confectioner’s sugar, sifted
1 teaspoon pure vanilla extract

Place cream cheese and butter in a medium bowl. With a handheld electric mixer, beat until light and fluffy, about 2 minutes. Add sugar and vanilla. Beat, on low speed to combine. If too soft, chill until slightly stiff, about 10 minutes, before using.

Icing Notes:

* Technique: Cake decorators will always tell you to ice a cake in two batches, first a “crumb layer” and then the more decorative one. Though I rarely bother, in this cake in particular, with its dark hue barely disguised by a thin layer of frosting, it is especially helpful. To do this, place a small amount of frosting on the cake and spread it over the entire surface that will be iced, thereby anchoring wayward crumbs in place so that they will not mess up the final product. A few minutes in the freezer or longer in the fridge will firm this up so that you have an ideal surface to build the real layer of frosting upon. (I did a rushed, half-assed one, hence the visible crumbs in the final product.)
* Quantity: The recipe here creates an amount of frosting that allows for a thin coat between and over the cake layers. I found it to have the ideal cake-to-frosting balance for this recipe. However, you might want to double the recipe if you prefer a more decadent, padded frosting layer.


Cappuccino Fudge Cheesecake
Adapted from Bon Appetit, February 2002

original site: http://smittenkitchen.com/2009/11/cappuccino-fudge-cheesecake/

If this cake were a turkey, it would, by Butterball’s portion calculator, serve 2 adults and 4 kids (My little guy, incidentally, would serve 11 adults and 4 children and yes, I do call dibs on the cheek meat.) Bon Appetit says it serves 12. But I’m going to put it’s portion size at 30 one-inch wedges. Yes, 30. Because if you know anyone who can eat more than a one-inch wedge of this cake, I might need to meet them. I might have to shake their hand.

The only major change I made to the recipe was I tweaked it to fit in the 9-inch springform I had, rather than the 10-inch springform the recipe calls for, by keeping the crust, ganache, and sour cream topping amounts the same while only making 3/4 of the cheesecake filling. It just made it. So your cake looks exactly as mine does, this is what I’ve shared with you below. Check out the original if you’d like a higher proportion of cheesecake to the crust and its cronies.

Crust
1 9-ounce box chocolate wafer cookies or 9 ounces of homemade chocolate wafers
6 ounces bittersweet or semisweet chocolate, coarsely chopped
1/2 cup (packed) dark brown sugar
1/8 teaspoon ground nutmeg
7 tablespoons hot melted unsalted butter

Ganache
1 1/2 cups heavy or whipping cream
20 ounces bittersweet or semisweet chocolate, chopped
1/4 cup Kahlúa or other coffee-flavored liqueur

Filling
3 8-ounce packages cream cheese, room temperature
1 cup sugar
1 1/2 tablespoons all purpose flour
1 1/2 tablespoons dark rum
1 1/2 tablespoons instant espresso powder or coffee crystals
1 1/2 tablespoons ground whole espresso coffee beans (medium-coarse grind) (I skipped this, increased the espresso powder instead)
2 teaspoons vanilla extract
1 1/2 teaspoons mild-flavored (light) molasses
3 large eggs

Topping
1 1/2 cups sour cream
1/3 cup sugar
2 teaspoons vanilla extract

A handful of chocolate covered espresso beans (optional)

Make crust: Finely grind cookies, chopped chocolate, brown sugar, and nutmeg in processor. Add butter and process until crumbs begin to stick together, scraping down bowl occasionally, about 1 minute. Transfer crumbs to 9-inch-diameter springform pan with 3-inch-high sides. Wrap plastic wrap around fingers and press crumb mixture firmly up sides to within 1/2 inch of top edge, then over bottom of pan.

Make ganache: Bring cream to simmer in large saucepan. Remove from heat; add chocolate and Kahlúa. Whisk until chocolate is melted and ganache is smooth. Pour 2 cups ganache over bottom of crust. Freeze until ganache layer is firm, about 30 minutes. Reserve remaining ganache; cover and let stand at room temperature to use later for decorating.

Make filling: Position rack in middle of oven and preheat to 350°F. Using electric mixer, beat cream cheese and sugar in large bowl until blended. Scrape down bowl, making sure you get to the bottom, where little pockets of unmixed cream cheese love to hid. Beat in flour. Stir rum, espresso powder, ground coffee, vanilla, and molasses in small bowl until instant coffee dissolves; beat into cream cheese mixture. Beat in eggs one at a time, scraping down sides of bowl between each addition.

Pour filling over cold ganache in crust — it will go nearly all of the way to the top, don’t panic. Place cheesecake on rimmed baking sheet. Bake until top is brown, puffed and cracked at edges, and the center two inches moves only slightly when pan is gently shaken, about one hour. Transfer cheesecake to rack. Cool 15 minutes while preparing topping (top of cheesecake will fall slightly, making room for topping). Maintain oven temperature.

Make topping: Whisk sour cream, sugar, and vanilla in medium bowl to blend. Pour topping over hot cheesecake, spreading to cover filling completely. Bake until topping is set, about 10 to 15 minutes. Transfer cheesecake to rack. Refrigerate hot cheesecake on rack until cool, about three hours.

Run small sharp knife between crust and pan sides to loosen cake; release pan sides. Transfer cheesecake to platter. Spoon reserved ganache into pastry bag fitted with small star tip. If you’d like to make an approximation (perhaps less rushed?) of the above decoration, pipe 6 diagonal lines atop cheesecake, spacing 1 inch apart. Repeat in opposite direction, making lattice. Pipe rosettes (or, uh, stars if you realize you do not have the energy nor inclination to practice rosette piping at that hour) of ganache around top edge of cake. Otherwise, have fun decorating freely. Espress(o) — ow — yourself!

Garnish with chocolate-covered espresso beans, if desired. Chill until lattice is firm, at least 6 hours.

Do ahead: Cake is best made a day ahead, so the flavors have time to settle. The cake also takes enough time to make that it’s best not to rush through it the day you want to serve it. It can be made up to four days ahead. Wrap loosely in foil, forming dome over lattice; keep chilled.
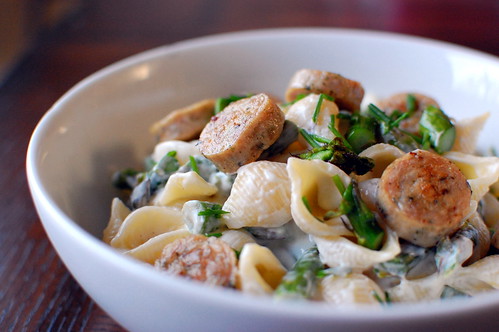
Pasta with goat cheese, asparagus, and chicken sausage

I made this recipe for dinner last night and it was delicious. I made a couple of small tweaks to it--I didn't use butter and just cooked the pasta in water with olive oil. I also added some slided cherry tomatoes (not cooked, just tossed them in to the pasta). It was very tasty, and I think the idea of adding a bit of the pasta water to the pasta when you're doing pasta with goat cheese is actually a really smart idea, it makes it into much more of a sauce than it otherwise would be.


Pasta with Goat Cheese, Asparagus, and Chicken Sausage
serves 4
adapted from Everyday Food: Fresh Flavor Fast
  • 2 bunches of asparagus (2 pounds), tough ends removed
  • olive oil
  • 3 Tablespoon unsalted butter cut into small pieces
  • kosher salt and ground black pepper
  • 4 links Roasted Garlic Chicken Sausage (optional)
  • 12 ounces short pasta shapes
  • 5 ounces fresh goat cheese, softened
  • 2 Tablespoons freshly grated Parmesan cheese
  • 2-3 Tablespoons snipped fresh chives, for garnish
Preheat oven to 450. Toss asparagus with olive oil, salt, and pepper, and place them on a baking sheet. Slice chicken sausage into 1-inch pieces, and place on the baking sheet alongside the asparagus. Roast until tender, tossing the asparagus and turning the sausage, about 10-15 minutes. Slice asparagus into 2-inch pieces.

Meanwhile, bring a large pot of water to a boil. Add 1 Tablespoon of salt, and cook the pasta until al dente. Reserve 1 1/2 cups of the cooking water, and drain the pasta.

Whisk together the goat cheese, butter, Parmesan, and 1/2 cup of the pasta water. Season with salt and pepper, and whisk until smooth.

Return the pasta to the pot, and toss with the goat-cheese mixture, asparagus, and chicken sausage. Add pasta water a few tablespoons at at time, until a thin sauce coats the pasta.

Divide evenly among shallow bowls, and garnish with chives.

Friday, March 19, 2010

Canadian Butter Tarts

My team is having a competition next Thursday to see who can make the best Canadian food. Apparently everyone is looking to me to win...I think largely (or really entirely) because I'm the only girl on the team. This apparently gives me a huge inherent advantage. It's surprisingly difficult to find traditional canadian food that looks the slightest bit appetizing, but I have found these butter tarts, which look like they should taste good, mostly because I think they're all fat. I'm going to make them this week and will let you know how they go!


Butter Tarts

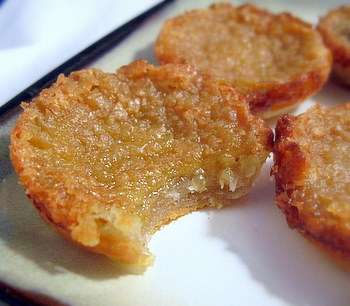
butter tart, bitten

A butter tart is a Canadian specialty that, unless you have friends or family living up North, you may never have experienced. I’ve certainly never seen them sold in any bakery around here. The pastries are made with a tart shell that is filled with a mixture of sugar and butter, held together with eggs. Often, the tart filling includes raisins or chopped nuts, but a plain tart is pretty standard - and pretty darn tasty, too.

The closest way I can think of to describe the overall texture of the tart is to say that it is a little bit like a pecan pie without the pecans. But that really only emcompasses a small part (the sweetness) of the tart. The filling is gooey and buttery, almost slick with a melt-in-your-mouth texture and just the right amount of caramely sweetness from the sugar. It is held together with a hint of flaky crispness from the pastry crust. The tarts are light, but rich, and it seems prudent to make them small so that you can enjoy a few bites at a time. I baked mine in a standard muffin pan, which worked out perfectly and didn’t require me to pull out a set of miniature tart pans.

This recipe turns out a very tasty butter tart. Many recipes call for the filling to be made with corn syrup (sometimes lots of corn syrup), but mine starts with brown sugar. I added a little bit of maple syrup for an extra hint of flavor, and made sure to include a pinch of salt to take the edge off the sweetness of the filling. Since I made two dozen, I made half with raisins and half without. The amount of raisins given below is approximate; just sprinkle a few raisins into each tart shell to suit your tastes. Since the raisins take up some of the filling space in the shells, you might get two or three fewer tarts if you omit them entirely, so keep that in mind. I used my pate brisee recipe to make the crust. One recipe makes enough dough for two dozen small tarts.

butter tarts with raisins

Butter Tarts
1 recipe for pate brisee, chilled (enough for a double crust pie)
1 cup brown sugar
1/4 cup butter, room temperature
2 large eggs
1 1/2 tsp apple cider vinegar
1 tbsp maple syrup
1 tsp vanilla extract
1/4 tsp salt
1 cup raisins

Preheat oven to 350F.
Roll out chilled pate brisee base on a lightly floured surface until it is about 1/8-inch thick. Use a 3.5- or 4-inch round cookie cutter (a fluted cookie cutter will give you a nice edge, if you have it) to cut out 24 rounds from the dough. Place each round into a muffin cup on a standard muffin tin and press down lightly to make sure the crust goes into the corners.
In a large bowl, cream together brown sugar and butter. When light and fluffy, beat in eggs, vinegar, maple syrup, vanilla extract and salt until smooth.
Divide raisins into tart shells and top each with a generous spoonful of filling to cover the raisins and reach the top of the crust.
Bake for 18-22 minutes, or until filling is golden and the edges of the crust are lightly browned.
Remove from pan and cool on a wire rack. Serve warm, at room temperature or cold (if you have completely cooled them before storing in the fridge).

Makes 2 dozen.


Sunday, March 14, 2010

Vegetarian Cassoulet


This would be pretty decent, without the garlicy homemade bread crumbs. With them, it is incredibly delicious. For some reason the blogger lady recommends Great Northern or another big white bean, but cassoulet is traditionally made with flageolet beans. These are totally endemic to France though, so they can be a bit hard to find (www.ranchogordo.com!!). I think she's probably right that adding sausage would make it even more amazing...SIGH...

Original site: http://smittenkitchen.com/2008/03/vegetarian-cassoulet/

Adapted from Gourmet, March 2008

For cassoulet
3 medium leeks (white and pale green parts only)
4 medium carrots, halved
lengthwise and cut into 1-inch-wide pieces
3 celery ribs, cut into 1-inch-wide pieces
4 garlic cloves, chopped
1/4 cup olive oil
4 thyme sprigs
2 parsley sprigs
1 Turkish or 1/2 California bay leaf
3 (19-ounce) cans cannellini or Great Northern beans, rinsed and drained or 4 1/2 cups cooked dried beans (dried beans cooking instructions here)
1 19-ounce can diced tomatoes, with their juice
3 tablespoons tomato paste
1 quart stock

For garlic crumbs
4 cups coarse fresh bread crumbs from a baguette
1/3 cup olive oil
1 tablespoon chopped garlic
1/4 cup chopped parsley

Make cassoulet:
Halve leeks lengthwise and cut crosswise into 1/2-inch pieces, then wash well and pat dry.

Cook leeks, carrots, celery, and garlic in oil with herb sprigs, bay leaf, cloves, and 1/2 teaspoon each of salt and pepper in a large heavy pot over medium heat, stirring occasionally, until softened and golden, about 15 minutes. Stir in beans, tomatoes, tomato paste, then stock, and simmer, partially covered, stirring occasionally, until carrots are tender but not falling apart, about 30 minutes.

Make garlic crumbs while cassoulet simmers:
Preheat oven to 350°F with rack in middle.

Toss bread crumbs with oil, garlic, and 1/4 teaspoon each of salt and pepper in a bowl until well coated. Spread in a baking pan and toast in oven, stirring once halfway through, until crisp and golden, 12 to 15 minutes. Cool crumbs in pan, then return to bowl and stir in parsley.

Finish cassoulet:
Discard herb sprigs and bay leaf. Mash some of beans in pot with a potato masher or back of a spoon to thicken broth. Season with salt and pepper. Just before serving, sprinkle with garlic crumbs.

How about some sausage with that! Slice one pound of cooked sausage into discs and mix with the bean and vegetable stew before adding the breadcrumbs. From here, you can either heat them through for another 15 minutes on the stove, then finish with the breadcrumbs, or add an additional cup of water/broth, scatter that breadcrumbs on top and bake it in a 350°F oven for 20 minutes until the sausage is heated through.

Monday, February 15, 2010

TIPS!

And I think this is cool.

http://www.thekitchn.com/thekitchn/tips-techniques/30-gold-medal-tips-that-pack-some-punch-in-the-kitchen--108787

Who knew you could test for egg freshness?

Creamy White Polenta with Mushrooms


So I haven't actually made this. To be honest. But I love this food blog and it looks really really awesome and I did make the mushroom part, which was great (even given the fact that I was feeling sort of lame and left out most of the butter). And grits are rad.

Original Post: http://smittenkitchen.com/2007/11/creamy-white-polenta-with-mushrooms/

Creamy White Polenta with Mushrooms and Mascarpone
Adapted from Jonathan Waxman, via Gourmet, October 2005


Just because I found this a little rich doesn’t mean it won’t work for you, but you might consider tweaking the ratios at bit. This makes a lot of grits to a relatively small amount of mushrooms. You could halve the grits or double the mushrooms, for example, or of course keep it like so if you want it to look more like the picture.

For polenta
4 1/2 cups water
1 cup coarse stone-ground white grits (preferably organic)
1/4 cup heavy cream
2 tablespoons finely grated Parmigiano-Reggiano
1 teaspoon salt
1/4 teaspoon black pepper

For mushrooms
1 pound assorted fresh exotic mushrooms such as porcini, oyster, chanterelle, lobster, and hedgehog
3 tablespoons extra-virgin olive oil
1 garlic clove, smashed
1/2 teaspoon salt
1/4 teaspoon black pepper
1/4 cup water
3 tablespoons cold unsalted butter
1 1/2 tablespoons fresh lemon juice
1 tablespoon chopped fresh flat-leaf parsley (we used chives)

For serving
1/2 cup mascarpone (though we used crème fraîche, and just a tad)
2 tablespoons finely grated Parmigiano-Reggiano

Make polenta: Bring water to a simmer in a 3- to 4-quart heavy saucepan. Add grits in a slow stream, whisking until incorporated. Simmer, stirring occasionally with a long-handled whisk or wooden spoon, until liquid is absorbed and polenta is thick and soft, about 30 minutes. (Grits will have a loose, risotto-like consistency.) Remove from heat and stir in cream, cheese, salt, and pepper. Keep warm, covered.

Saute mushrooms while polenta simmers: If using porcini, halve if large, then slice lengthwise into 1/4-inch thick slices. If using oysters, trim spongy base if necessary and slice caps into 1/2-inch-wide strips. If using chanterelles, leave small mushrooms whole, halve if medium, and quarter if large. If using lobsters, cut into 1/2-inch pieces. If using hedgehogs, trim base of stems and halve caps if large.

Heat oil in a 10-inch heavy skillet over moderately high heat until hot but not smoking, then saute mushrooms, garlic, salt, and pepper, stirring occasionally, until mushrooms are golden and any liquid they give off is evaporated, 6 to 8 minutes.

Add water, butter, lemon juice, and parsley and heat, swirling skillet, until butter melts and liquid forms a sauce.

To serve: Top each serving of polenta with mushrooms and mascarpone. Serve immediately (polenta stiffens as it cools), sprinkled with Parmigiano-Reggiano.

Note: Mushroom sauce can be made 1 hour ahead and kept, covered, at room temperature. Reheat before using.

Wednesday, January 27, 2010

A healthier version of Arroz con Pollo

Arthur and I whipped up this recipe last week by just throwing a bunch of spices into a wok with some veggies, brown rice and chicken (and a pineapple....which I think Arthur then regretted, but I kind of enjoyed). It was very delicious and made plenty for leftovers the next day. Enjoy!

Ingredients:
  • Chicken
  • Brown rice
  • 1 can diced or stewed tomatoes (not flavored)
  • Bell pepper(s)
  • Onion
  • Garlic
  • mushrooms
  • Broccoli
  • Cumin
  • Tumeric
Directions:
  1. Start cooking the brown rice ahead of time--I don't really know exact quantities here so just base it on how much you think you'd eat. I think we made about 1.5 cups of wet rice
  2. Bake chicken in oven so that it is fully cooked but not dry. While the chicken is baking, you can begin your stir-fry.
  3. Saute onion and garlic in olive oil until it starts to brown slightly
  4. Add other vegetables and saute until somewhat cooked, but not completely soggy--you still have to add the chicken and the rice
  5. Shred the baked chicken with a fork and toss it into the stir-fry
  6. Add cumin and tumeric to taste
  7. Add rice and stewed tomatoes and let rice absorb the juices from the can of tomatoes
  8. Continue to add spices to taste
I thought this was a very delicious dish...if you guys make any changes to it, let me know, I'd love to make it again with additions. One potential addition would be sweet potato, though I'm not sure how well it would go with the mixture....just a thought :)

Friday, January 15, 2010

Tanya's pink sauce

Hey guys,

I thought I'd put this recipe on the blog so that I can easily find it when need be. Huge thanks to Tanya for this...it was so delicious. I prefer it without the sausage...but I think most people would disagree :). A tip from Emily: "Note that in order to make the sauce turn out right, you also have to add a little tomato paste and a small can of tomato sauce. otherwise the sauce turns out really watery and a bit strange."

Love,
margs

Mom's Pink Sauce:

Ingredients:
2 tablespoons olive oil
1/4 cup carrots
1/2 cup onions
2 teaspoons minced garlic cloves
1/4 cup minced green onions
2 cups diced tomatoes in juice (16 ounce can of tam)
1/4 teaspoon crushed red pepper flakes
3 tablespoons fresh basil
1/2 pint heavy cream
4 cups cooked penne pasta
salt to taste
*should make 6 servings (consider doubling)

directions:
chop carrots and onions
sauce pan over medium heat, when hot add olive oil,

chopped carrots and onions
cook until carrots / onions soften and brown
add garlic, green onions, canned diced tomatoes
cook 15 minutes
add cream, crushed red pepper flakes, basil
cook another 15 minutes
cook penne pasta according to directions
place hot penne pasta in shallow pasta dish or bowl

spicy italian raw sausage, take out of casing and

crumble it (like cooking ground beef)
or get the precooked and just slice